Automating Image Scanning with Jenkins
By Xiaofeng Sun
Containers provide an easy and efficient way to deploy applications. But container images may contain open source code over which you don’t have a full control. Many vulnerabilities in open source projects have been reported, and you may decide to use these libraries with vulnerabilities or not after scanning the images and reviewing the vulnerability information for them.
The NeuVector Vulnerability Scanner Jenkins plugin can scan the images after your image is built in Jenkins. The scanner is part of the NeuVector Container Security Platform. You can read about all the other exciting 2.0 features here.
Here I will introduce the steps to install and use the Jenkins plugin.
Jenkins Plugin Installation
First, go to Jenkins in your browser to search for the NeuVector plug-in. This can be found in:
-> Manage Jenkins -> Manage Plugins -> Available -> filter -> search `Neuvector Vulnerability Scanner` ->
Select it and click `install without restart.’
Deploy the NeuVector Allinone or Controller container if you haven’t already done so on a host reachable by the Jenkins server. This can be on the same server as Jenkins if desired. Make a note of the IP address of the host where the Allinone or Controller is running.
There are two scenarios for image scanning, local and registry scanning.
- Local Image Scan. If you use the plugin to scan local images (before pushing to any registries), you will have to install the NeuVector Scanner (Allinone or Controller) on the node where the images exist.
- Registry Image Scan. If you use the plugin to scan registry images (after pushing to any registries, but as part of the Jenkins build process), the NeuVector Scanner can be installed on any node in the network with connectivity between the registry, NeuVector Scanner, and Jenkins.
Global Configuration in Jenkins
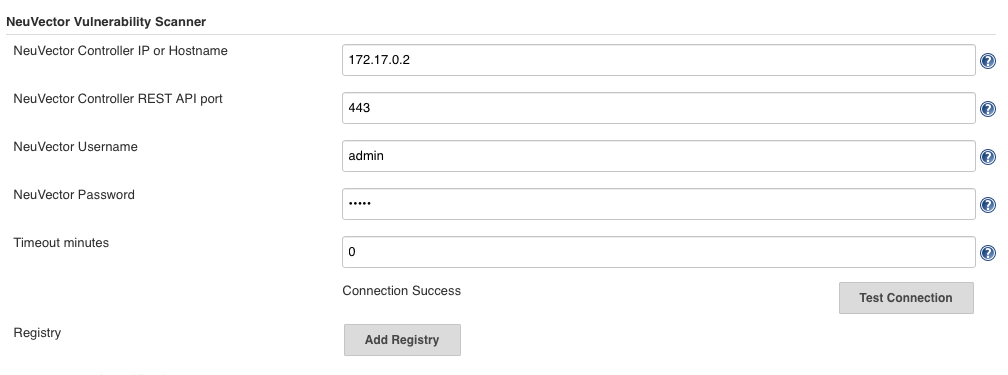
After installing the plugin, find the ‘NeuVector Vulnerability Scanner’ section in the global configuration page (Jenkins ‘Configure System’). Enter values for the NeuVector Controller IP, port, username, and password. You may click the ‘Test Connection’ button to validate the values. It will show ‘Connection Success’ or an error message.
The timeout minutes value will terminate the build step within the time entered. The default value of 0 means no timeout will occur.
Click the ‘Add Registry’ to enter values for the registry you will use in your project. If you will be only scanning local images, you don’t need to add a registry here.
Scenario 1: global configuration example for local image scan
Scenario 2: global configuration example for registry image scan

Local Configuration
In your project, choose the ‘NeuVector Vulnerability Scanner’ plugin from the drop down menu in the ‘Add build step.’ Choose Local or a registry name which is the nickname you entered in global config. Enter the repository and image tag name to be scanned. You may choose Jenkins default environment variables for the repository or tag, e.g. $JOB_NAME, $BUILD_TAG, $BUILD_NUMBER. Enter the values for the number of high or medium, and for any name of the vulnerabilities present to fail the build.
After the build is finished, a NeuVector report will be generated. It will show the scan details and errors if any.
Scenario 1: local configuration example

Scenario 2: local configuration example

Jenkins Pipeline
For the Jenkins pipeline project, you may write your own pipeline script directly, or click the ‘pipeline syntax’ to generate the script if you are new to the pipeline style task.

Select the NeuVector Vulnerability Scanner from the drop-down, configure it, and Generate the script.

Copy the script into your Jenkins task script.
Simple pipeline script example:
node {
  stage('Scan image') {
    neuvector registrySelection: 'Local', repository: 'alpine'
  }
}
Additional Stages
Add your own pre- and post- image scan stages, for example in the Pipeline stage view example below.

You are now ready to start your Jenkins builds and trigger the NeuVector Vulnerability Scanner to report any vulnerabilities!
Related Articles
Feb 01st, 2023
Container Security: Network Visibility
Feb 01st, 2023
Container Security: Compliance with NeuVector by SUSE
Feb 01st, 2023
Kubernetes Security: Container Segmentation
Feb 15th, 2023